An afternoon of PYO and a blackcurrant arctic roll

Blackcurrant arctic roll
I absolutely adore blackcurrants. I used to grow them a few years ago – I had a bush that grew quite happily in a pot on the flat roof in my old flat, but when I moved and planted it out into the garden here, it promptly died and I’ve not yet replaced it. I picked a good crop of blackcurrants at the PYO without any particular plans for them. My first thought was a blackcurrant trifle, but R peculiarly objects to whipped cream. But some way of combining the tart fruit with thick cream and sweet soft cake stuck in my mind. A cake wouldn’t do, we wouldn’t eat it fast enough, so I decided to invent a new version of an arctic roll. I’ve not eaten an arctic roll for years. It is ripe for reinvention, there must be so many variations you could do. It must be set for a comeback, I almost can’t believe it’s been out of fashion for so long.
This one is definitely a weekend baking project and I’m afraid a bit washing-up tastic. But worth it. I’m sure there are many ways that this could be simplified, but it’s not complicated, it just needs time.

Pick your own harvest
A trip to the PYO farm down in Esher was a response to the cabin fever that had developed after spending most of the weekend sheltering from a deluge of rain. Its quite hard not to go mad with the quantities of everything, but I picked quite a lot of berries knowing that I could freeze them if nothing else. Once this came to mind, the freezer was not an option.
First up the ice cream filling. I wanted a filling that didn’t need churning, so I could just pour it into the mould and leave it to freeze without intervention. About the cylindrical mould. I had numerous ideas about how to achieve a cylinder of ice cream. I thought about buying a length of pipe from a DIY shop, using a soft drink bottle, maybe cut in half, although I wasn’t sure how I’d seal the ends. I thought about using a couple of empty baked bean tins, lined up end to end. Then I saw in my bathroom a cylindrical cardboard box that had once contained a shower gel. This was ideal, as it had a base and a lid, so I could fill it and lie it down in the freezer. I simply lined it with clingfilm and that was it. The cylinder I used had approx 1 pint volume.
I had about 300g of blackcurrants, so that’s how many I used. I wanted a smooth puree to swirl through ice cream. They went into a pan with a good glug of cassis and 75g caster sugar. I simmered them gently for 5-10mins until the fruit had burst and the juice reduced a little and syrupy. Blitz these with a handblender and then sieve to remove all the pips and skin. My new hand held spatula was great for this. Leave to cool.
In the meantime I made the ice cream base. In order to add volume and prevent the ice cream from setting solid, I decided to make a meringue based cream. Its technically not an ice cream, but the easy way to go if you don’t have an ice cream machine like me. Start by separating 3 eggs into bowls that are big enough to whisk them up to a good volume. Start with the egg whites. Egg whites don’t like any grease, so unless you meticulously wash your whisk after whisking the other components they won’t whisk up properly. However, a bit of egg white in in yolks or cream won’t matter a bit. Whisk the whites until they form firm peaks and then add 6tbsp caster sugar one spoon at a time, whisking briefly between each addition. You should have a smooth glossy meringue. Then whisk the egg yolks with another 3 tbsp caster sugar until thick and pale. Finally whisk 400ml double cream till it is thickened but still soft and slightly floppy.

Swirl the blackcurrant through the ice cream
Fold the egg yolk mix into the cream first, then fold in the egg white mix gently until just combined. Then pour over the blackcurrant puree and swirl through gently – just a couple of stirs to get a nice ripple effect. Gently spoon the mixture into your mould and tap firmly once or twice on the worktop to get rid of any big air pockets. Freeze for at least 6 hours, or overnight.
Next up the sponge for around the outside. I’m not entirely sure what inspired me to give this two tone effect a go, but once I had thought of it, nothing was going to stop me. I normally hesitate at any recipe that needs a special piece of equipment, let alone one that necessitates a trip to a DIY store. But I was making a trip to B&Q anyway and so buying a tile adhesive applicator for less than £1 seemed reasonable enough in my quest for super-pretty cake. If a trip to a DIY shop is a step too far, I dare say the same effect could be achieved with a piping bag and a steady hand. Or plain cake would taste exactly the same, frankly.
I happened upon a recipe on the daring bakers website, which I decided to follow, albeit cutting down on the quantities for my tin. http://thedaringkitchen.com/recipe/biscuit-joconde-imprimeentremet
I used a 35 x 25cm swiss roll tin . Firstly you make the stripes. I am going to lapse into ounce measures here. Baking is sometimes much easier in ounces. I learnt to bake in ounces and generally still think in ounces when devising a recipe. So into a bowl went 3oz each of butter and icing sugar, which I creamed together briefly until fluffy. Then add 3 egg whites and 3oz plain flour plus 1tbsp (you see how ounces are easier – its just 3 of everything!). Finally some food colouring to get the right colour. I wish mine had come out a bit more purple to be honest, I was aiming for something that would be blackcurrant-esque, so was adding about 2 parts red dye to every 1 part blue dye till it looked strong enough. I think I should have been a bit bolder.

Tile adhesive gadget to make the stripes
Now for the fun and messy bit. Cut out a sheet of baking parchment that will fit inside your tin. Stick it down onto a flat surface (I just used a couple of blobs of the mix) and then spread over your paste. Wanting to avoid waste, this paste will only cover 2/3 – 3/4 of the length at a decent thickness, but I figured this would be fine, as the mixture that I scraped off could be reused for the other end. Then firmly and steadily drag your tile adhesive spreader through the paste to make the lines. I did mine at a diagonal. With the mixture you remove, cover the other end of the sheet and repeat until you have a full sheet of lines. Carefully lift the parchment and put it into your baking tin, then into the freezer for about 15 minutes.
Here are some lessons I learned from the above. 1 – make sure your flat surface is totally flat and doesn’t have a lip. The first tray I used had a slight lip and the lines went all wonky at the edge. 2 – don’t do this at the edge of your work surface as you might just scrape the mix over the edge and down the front of your cupboards!
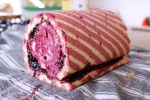
Then for the white sponge. This is a whisked, nearly fat free recipe. Start by whisking 2 egg whites to soft peaks and then beating in 1 tsp caster sugar at the end. In another bowl mix together 2 whole eggs, 2 oz ground almonds, 2 oz icing sugar and 1tbsp plain flour. When this is smooth, fold in the whisked egg whites, followed by 1 tbsp melted butter. Spread evenly over the top of the frozen stripes and then bake for 15-20mins on 170C until lightly golden brown and springy. Be careful not to overbake or it will dry out and crack when you roll it. Turn the warm cake out onto a clean tea towel, stripes side down, and gently roll it from a short end, using the tea towel to help, not too tightly, so that it cools in a curled shape.
-

- Spread over the jam
-

- add your moulded ice cream
-
- wrap and roll
When cool unroll and remove the parchment paper. Place back on the tea towel, keeping the stripes side down and spread generously with blackcurrant jam. I used nearly an entire jar to get a good layer. Then unmould your ice cream and place at one end and gently roll up. Trim any excess cake from the sides and end and then quickly wrap in cling film and place back in the freezer till you are ready to eat.
5 spare egg yolks went into the fridge, hoping to find a home during the week……

